
Setting up dual monitors is one of the quickest ways to seriously upgrade your workflow. The whole process really boils down to three parts: getting the monitors physically plugged in, telling your computer how to use them, and then arranging everything so it works for you. Let's walk through it together.
Why a Dual Monitor Setup Is a Game Changer for Productivity
If your workday involves constantly flicking between a dozen different windows and apps, a second monitor isn't just a nice-to-have—it's an essential upgrade. Think of it as doubling your digital desktop. It’s the difference between having a tiny coffee table to work on versus a full-sized desk.
You can finally keep your research visible on one screen while you write on the other, or have your email and team chat open without it covering up what you’re actually trying to do.
Here in Hamilton, we've seen this become the standard setup, especially with so many people now working from home. From small business owners juggling invoices and client emails to students trying to write an essay with five different source documents open, it just removes the constant friction of window-switching. It makes for a much smoother, more focused day.
The Tangible Benefits of More Screen Space
Adding that second display does more than just look impressive; it delivers some very real advantages. A bigger visual workspace means you spend far less time minimizing, maximizing, and shuffling windows around. Those little seconds you save add up surprisingly fast over the course of a day.
In fact, a dual monitor setup is a true game changer, offering a visual expansion that can significantly boost productivity. The most common benefits we hear about are:
- Effortless Multitasking: Keep your source material, data, or team chats open on one screen while you create, write, or code on the main one. No more ALT-tabbing.
- Easy Comparisons: Drag documents, spreadsheets, or images side-by-side to compare them at full size. This is a lifesaver for anyone who needs to spot differences or cross-reference information.
- Better Organization: Dedicate entire screens to specific tasks. Maybe one monitor is for communication, and the other is for deep work. It helps create a less chaotic digital environment. Speaking of speed, a faster storage drive also makes a huge difference. You can learn more in our guide on what a solid state drive is.
I've seen it myself—aligning your monitors, say, by using two identical 27-inch 1440p screens, can make a massive difference. Some research even suggests it can increase efficiency by up to 42% in multitasking scenarios. We see this mirrored in the high-performance setups of local Hamilton gamers. You can discover more insights about these findings from recent data.
As Hamilton's go-to for computer & laptop repairs in Hamilton, we've seen time and again how a properly configured multi-monitor system can completely transform a workspace. This guide will get you there.
Your Essential Hardware Checklist Before You Begin
Before you get excited and start plugging things in, a quick hardware check can save you a world of frustration later. Think of this as your pre-flight inspection. Getting it right from the start prevents that all-too-common moment of realizing you have the wrong cable halfway through the process.
First things first, let's play detective with your computer's video ports. Spin your desktop computer around or take a look at the sides of your laptop. You're looking for a few specific shapes.
- HDMI: This is the one you've probably seen a hundred times. It’s a trapezoid-shaped port, wider at the bottom, and found on nearly all modern computers and monitors.
- DisplayPort: Look for a rectangular port with one corner snipped off at an angle. It's a favourite on gaming PCs and business-grade machines, often because it supports higher refresh rates.
- USB-C (with Thunderbolt or DisplayPort Alt Mode): This small, oval port is the new kid on the block, especially on modern laptops. The tricky part is that not all USB-C ports can handle video. You need to look for a small lightning bolt symbol (for Thunderbolt) or a "DP" logo (for DisplayPort) right next to the port to confirm it's video-capable.
Knowing your ports is half the battle, as it dictates exactly what cables you'll need. Honestly, a simple cable mismatch is one of the most common issues we see providing computer & laptop repairs in Hamilton. If your laptop only has USB-C and your monitor only has HDMI, you're going to need a specific USB-C to HDMI adapter or cable.
Matching Your Gear for a Flawless Setup
Once you've identified your ports, you need to be sure your graphics card can actually handle two displays. Most modern computers are built for it, but older or more basic models might be limited to a single video output. If you're running into that wall and thinking about an upgrade, our guide on the benefits of an external graphics card is a great place to start.
Now, let's get your gear together. You'll need:
- Your two monitors, of course.
- The computer or laptop that will be running the show.
- The right video cables for each monitor (e.g., two HDMI cables, or maybe one HDMI and one DisplayPort).
- Any adapters required to bridge the gap between your computer's ports and your monitor's inputs.
This handy flowchart can help you visualize how different setups cater to specific needs, whether you're a hardcore multitasker or a gamer looking for immersion.
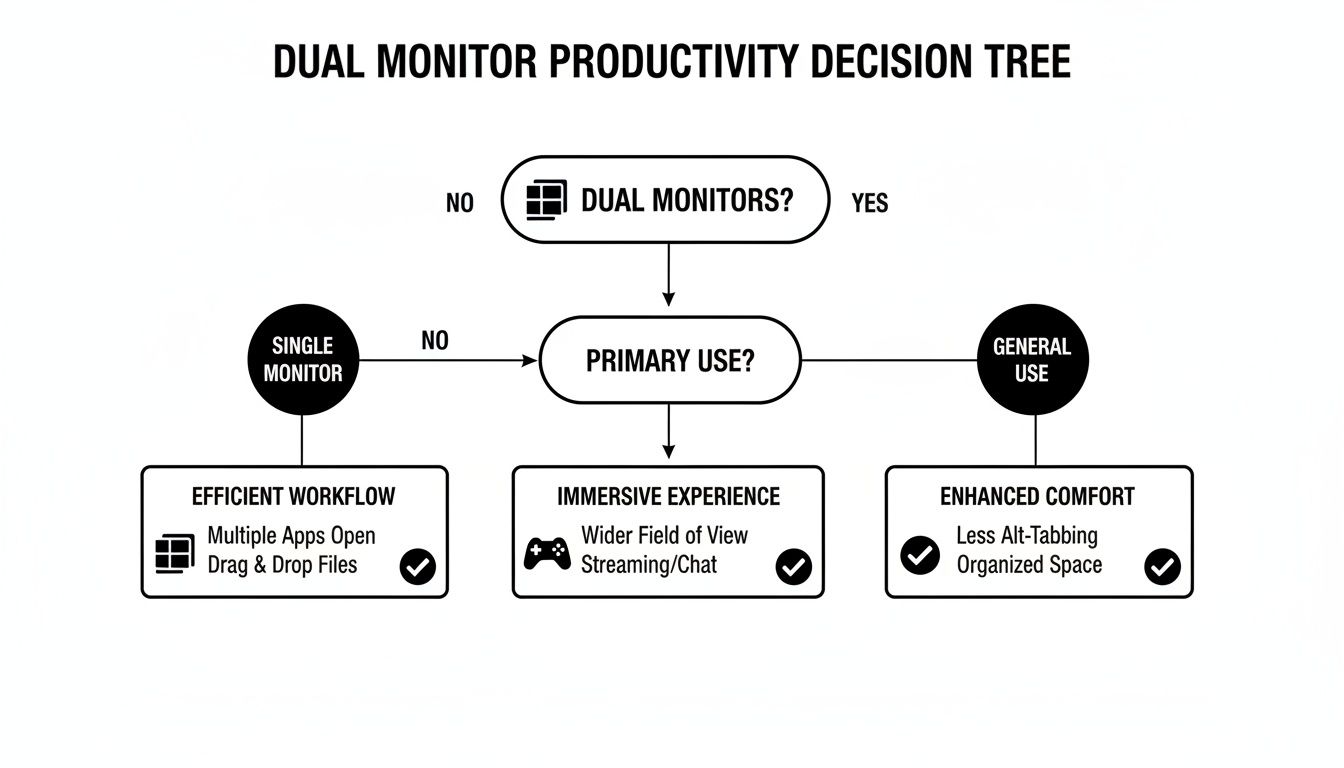
The main takeaway here? Planning your setup around what you actually do all day ensures you get the most out of your new workspace from the get-go.
Video Port and Cable Compatibility Guide
To make things even clearer, here’s a quick reference table. Use it to identify your computer's ports and figure out the exact cable or adapter you'll need for your dual monitor setup.
| Port Type | Best For | Common Devices | Adapter Needed For |
|---|---|---|---|
| HDMI | General use, home theatre, most consumer displays | TVs, most monitors, laptops, game consoles | Connecting to DVI, DisplayPort, or USB-C |
| DisplayPort | High-resolution gaming, multiple monitors (daisy-chaining) | Gaming PCs, business laptops, high-end monitors | Connecting to HDMI, DVI, or VGA |
| USB-C | Modern laptops, single-cable docking solutions | MacBooks, Ultrabooks, modern docking stations | Connecting to HDMI or DisplayPort on most monitors |
| DVI | Older monitors and PCs, digital signal quality | Older desktop PCs, some budget monitors | Connecting to modern ports like HDMI or DisplayPort |
| VGA | Legacy devices, analog signal (avoid if possible) | Very old projectors, computers, and monitors | Connecting to any modern digital port (HDMI/DP) |
Choosing the right connection is key. Whenever you can, stick with a direct connection (like DisplayPort to DisplayPort) for the best performance and reliability.
A great setup isn't just about the screens; it's also about how you use them. Investing in a quality Commercial Grade Dual Monitor Arm can completely transform your desk. It frees up a surprising amount of space and lets you position your screens at the perfect height and angle for your posture—a huge win for long-term comfort.
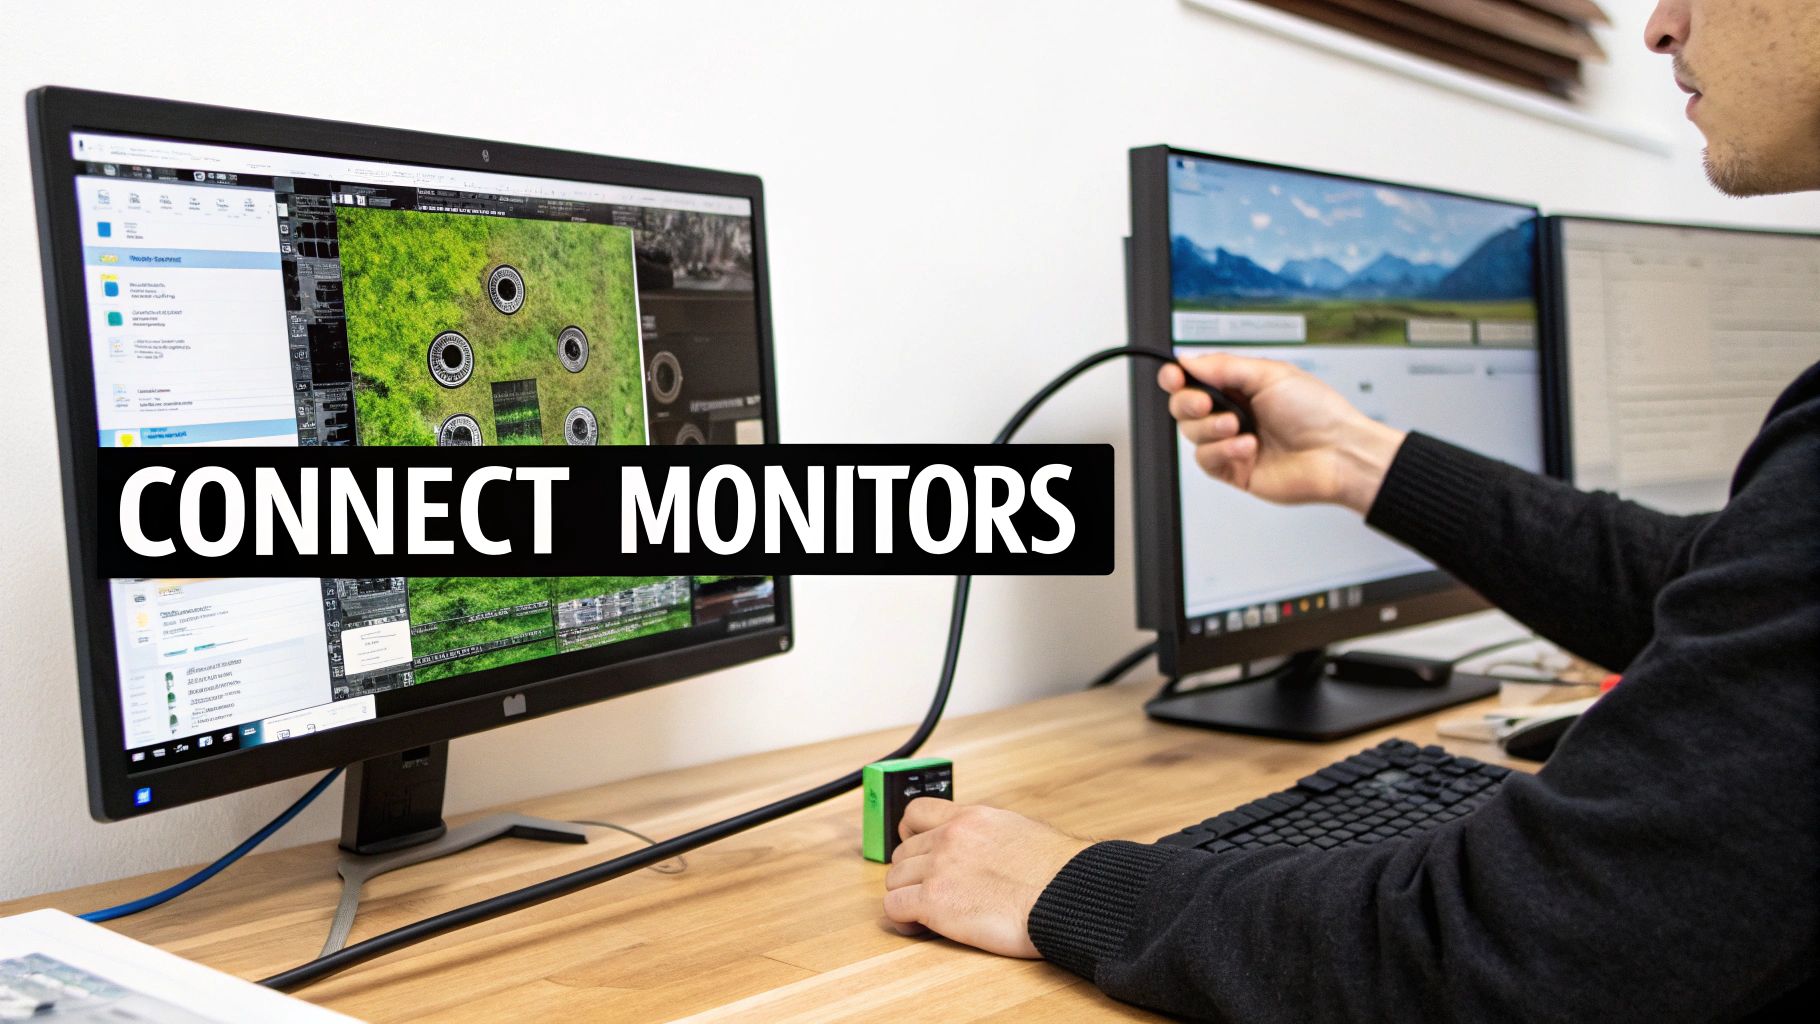
Connecting Your Monitors: A Practical Walkthrough
Alright, you've got your hardware sorted. Now for the fun part: plugging it all in. This is where we physically connect everything, and trust me, taking a moment to do this the right way now will save you a world of troubleshooting headaches later.
The single most common mistake we see during our computer & laptop repairs in Hamilton is people plugging their monitor into the wrong port, especially on desktop PCs. It’s an easy mistake to make, but one that can seriously hamstring your computer's performance, particularly if you're into gaming or creative work.
Before you touch a single cable, power down your computer and unplug both monitors from the wall. This is a non-negotiable step. It prevents any potential electrical surprises and helps your system properly recognize the new hardware when it boots back up.
Desktops: The Graphics Card Rule
If you have a desktop PC, take a look at the back. You'll likely see a cluster of ports up high (part of the motherboard) and another set lower down. That lower set belongs to your dedicated graphics card—and that's where the magic happens.
Always plug your monitors directly into the graphics card.
It’s tempting to use the ports higher up on the motherboard’s I/O panel, but don't. Those ports rely on your computer’s much weaker integrated graphics. Using them means you're completely bypassing that powerful (and often expensive) graphics card you paid for. The result? Sluggish, choppy performance.
- Primary Monitor: Connect this to the best port available on your graphics card, which is usually a DisplayPort or a modern HDMI port.
- Secondary Monitor: Plug this into another available port on that same graphics card.
Following this simple rule ensures both of your screens are powered by the component built for heavy lifting, giving you a smooth, responsive experience across your entire digital workspace.
Think of the motherboard video ports as your emergency backup. They're really only useful if your main graphics card fails or if you're an advanced user trying to hook up a third or fourth monitor after running out of ports on your primary card.
Laptops: The Docking Station and Adapter Game
For laptop users, the setup is a bit different. Your ports are lined up on the sides of the device, and you might only have one HDMI and a couple of USB-C ports to work with.
A docking station or a good USB-C hub is your best friend here. These gadgets act as a central hub, letting you connect both monitors, your power cable, and other peripherals with just one clean cable running to your laptop. It’s the ultimate solution for a tidy desk and makes grabbing your laptop to go a breeze.
If you're going the direct route without a dock:
- Connect your first monitor to the laptop's dedicated video port (this is almost always HDMI).
- Use an available USB-C or Thunderbolt port for the second monitor. This will likely require an adapter.
Sometimes, you might need a specific type of connection that isn't built-in. In those cases, a reliable USB to HDMI cable can be a simple and effective solution.
With all your cables securely in place, power on your monitors first, then boot up your computer. This sequence gives your system the best chance to automatically detect both displays right from the get-go.
Telling Your Computer How to Use Both Screens
With the cables plugged in and the monitors powered on, the physical work is behind you. Now it's time for the fun part: telling your computer how to actually use all that new screen real estate. This is where you transform two separate displays into one seamless, productive desktop.
The process has a few key goals, whether you're on a PC or a Mac. You need to confirm the computer sees both monitors, decide how they'll work together, and then arrange them in the software to match their physical position on your desk.
Fine-Tuning Your Dual Monitor Setup in Windows
Windows is usually pretty smart about this. The moment you plug in a second monitor, it often detects it automatically. If you see your desktop wallpaper pop up on the new screen, you’re already most of the way there.
For a quick setup, the Windows key + P shortcut is your best friend. Pressing it brings up a handy sidebar with four clear options.
- PC screen only: Ignores your second monitor completely.
- Duplicate: Mirrors your main display. This is perfect for presentations where you want your audience to see exactly what you see.
- Extend: This is the magic setting for most dual-monitor users. It creates one giant desktop that stretches across both screens, letting you drag windows back and forth.
- Second screen only: Shuts off your primary display (like a laptop screen when docked) and uses only the external monitor.
For more granular control, right-click a blank area of your desktop and choose Display settings. This opens up the main control panel where you'll see your monitors represented as numbered boxes, usually 1 and 2.
If one of your monitors isn't showing up here, clicking the Detect button can sometimes give Windows the nudge it needs. This menu is also where you'll solve some of the most common setup headaches. For instance, if you're mixing and matching cables, our guide on connecting DVI to DisplayPort can be a lifesaver for figuring out adapters.
This is what the Windows Display settings menu looks like. You can see how the system identifies and lets you arrange your screens.
The most critical step here is to drag those numbered boxes so they match the real-world layout on your desk. Is your second monitor physically on the left? Then drag box 2 to the left of box 1. If you skip this, your mouse will get lost when you try to move it from one screen to the other, exiting on the right to appear on the left—it's incredibly disorienting.
Pro Tip: After arranging the monitors, click on the one you consider your "main" screen. Then, scroll down and check the box for "Make this my main display." This tells Windows where to put your Start Menu, taskbar icons, and where new apps should open by default.
Configuring Multiple Displays on a Mac
Apple's approach is just as intuitive. As soon as you connect another display, macOS typically extends your desktop onto it without you having to do a thing.
To customize the setup, you’ll want to head into the system settings.
- Click the Apple menu in the top-left corner.
- Open System Settings (or System Preferences if you're on an older version of macOS).
- Find and click on Displays.
Here, you'll see a settings window for each of your connected displays, letting you tweak things like brightness and resolution for each one individually.
To get them arranged correctly, look for an Arrangement tab or a button that lets you arrange them. You'll see blue rectangles that represent your monitors. Much like in Windows, you can simply click and drag these boxes to reflect how they're set up on your desk.
Pay attention to the thin white bar at the top of one of the blue boxes—that designates your primary display. This is the screen where your dock and menu bar will live. You can just drag that white bar over to the other monitor to switch which one is your main screen.
If you’ve followed these steps and things still feel off, sometimes a stubborn software glitch or a hidden hardware conflict is to blame. In those cases, a quick call to a local expert for computer & laptop repairs in Hamilton can get things sorted out without the headache.
Optimizing Your Workspace for Comfort and Performance
So, you've got your monitors connected and talking to your computer. That’s a huge win, but the real productivity boost comes from setting up your physical space for comfort and a smooth workflow. A great setup is more than just having two screens; it’s about creating an ergonomic command centre that prevents the neck and back strain we see all too often during computer & laptop repairs in Hamilton.
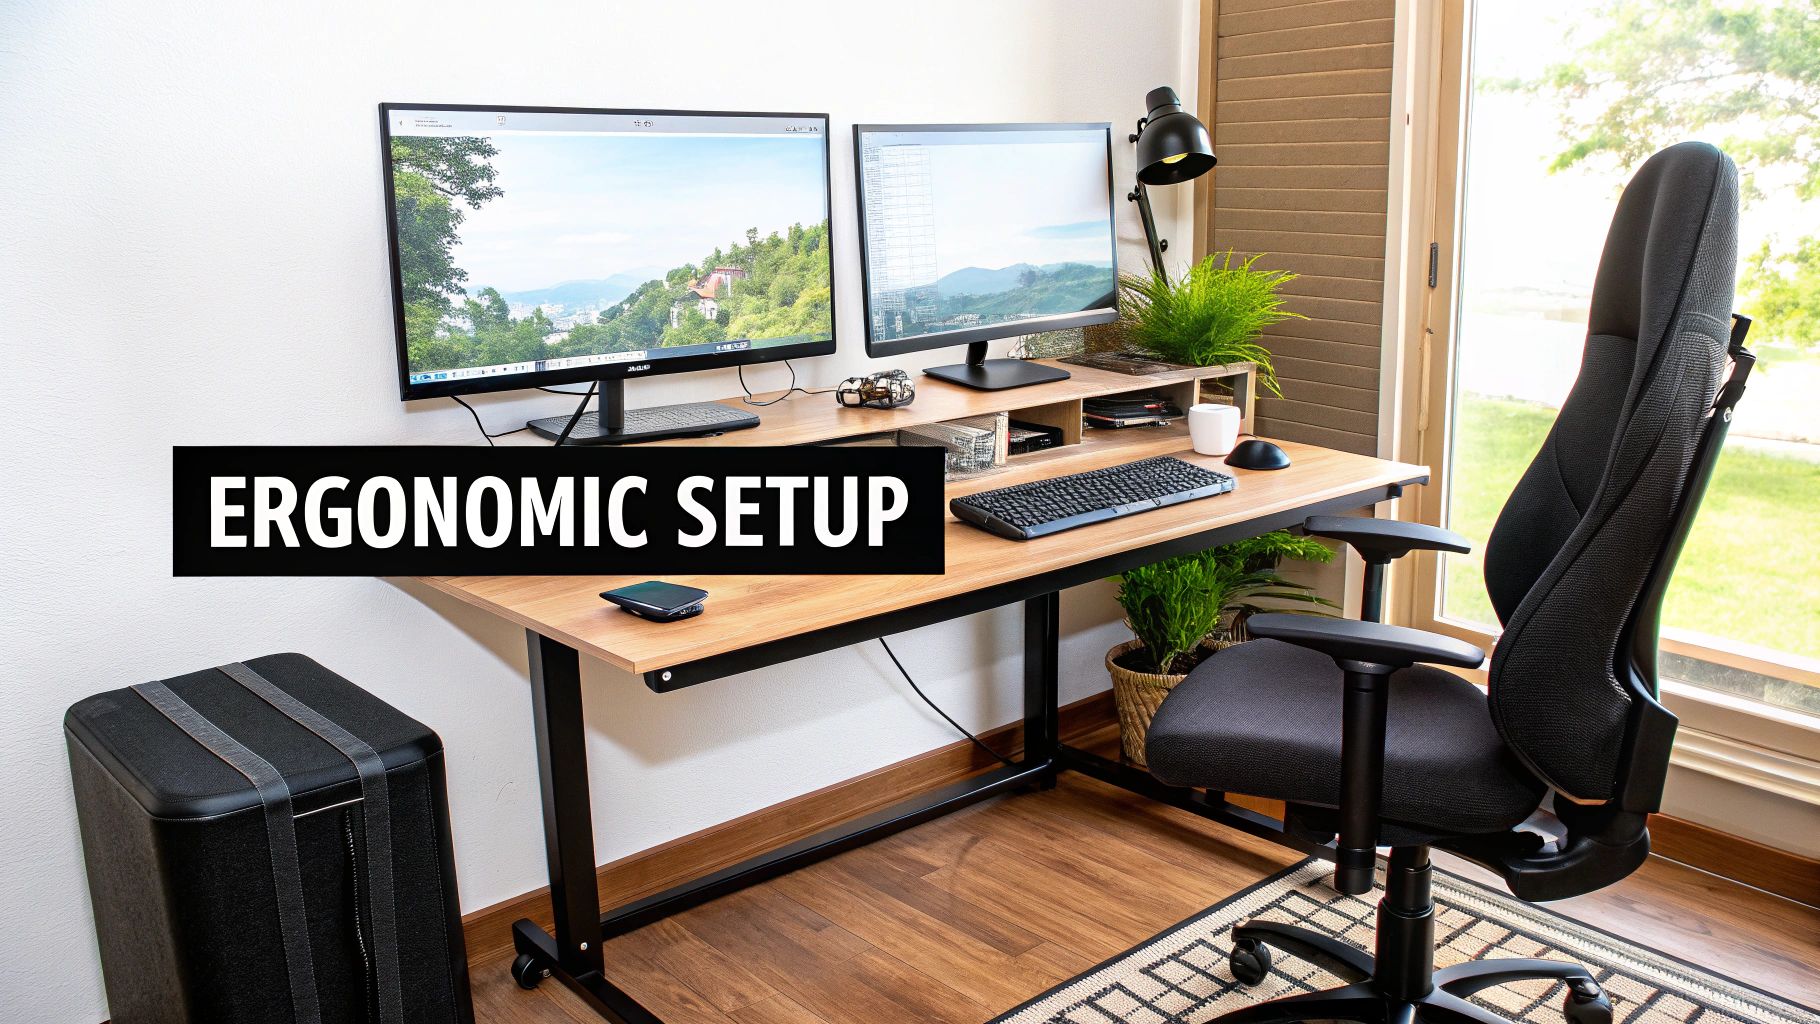
The trick is to minimize how much you have to move your head and eyes. Figure out which monitor will be your "primary"—the one you spend most of your time looking at. That screen should be dead centre, right in front of you. The secondary one goes off to the side, angled slightly inward toward you.
Think of it like an open book or a cockpit. This arrangement keeps everything in your natural field of view, so a quick glance is all you need.
Ergonomics First—Your Body Will Thank You
Screen height is absolutely critical for avoiding pain after a long day. When you’re sitting up straight in your chair, the top edge of your monitors should be at or just a little below your eye level. If you're constantly tilting your head down or craning your neck up, that's your cue to make a change.
One of the biggest mistakes I see is people placing their monitors side-by-side symmetrically, forcing them to sit turned at an angle all day. Don't do it. Always put your main display directly in front and the secondary one to your preferred side. Your neck will thank you.
Honestly, a good monitor stand or a dual monitor arm is one of the best upgrades you can buy. Not only does it let you dial in the perfect height and angle for both screens, but it also frees up a ton of desk space underneath. It's no wonder the market for these stands is booming; Cognitive Market Research expects it to grow by over 8.5% in North America, largely thanks to the rise of home offices in places like Hamilton. You can read the full research on monitor stand market growth.
Supercharge Your Workflow with Smart Tools
With your physical desk sorted, it’s time to organize your digital one. Juggling windows across two screens can get messy fast without a little help.
This is where window management software comes in handy:
- Windows PowerToys (FancyZones): This is a free, powerhouse tool directly from Microsoft. It lets you carve your screens into custom layouts, so you can snap windows into perfect position with a keyboard shortcut. It’s a game-changer for organization.
- Magnet (macOS): For Mac users, Magnet is a fantastic paid app that brings that same window-snapping magic to your desktop. It makes arranging your applications incredibly simple.
Last but not least, nothing kills a professional vibe like a mess of wires. A tidy setup just feels better and helps you focus. When you're ready to tackle that, check out our pro tips for PC cable management in Hamilton to give your new workspace a truly polished look.
Troubleshooting Common Dual Monitor Problems
Even the most straightforward tech setups can hit a snag. So, your dual monitor dream isn't quite working as planned? Don't throw in the towel just yet. Most of the time, the fix is surprisingly simple, and you can sort it out yourself without getting too frustrated.
Before you start digging into software settings, always start with the basics. Check your physical connections. I’ve seen it a hundred times during computer & laptop repairs in Hamilton: a cable that looks plugged in is actually just a millimetre loose, and that's all it takes to cause a blank screen. Make sure every plug is seated firmly in its port, both on the back of your computer and on each monitor.
When Your Second Monitor Isn't Detected
This is probably the most common headache. You’ve connected everything, you hear the little chime, but your desktop is still stuck on a single screen. Your computer just isn't seeing the second display. The first thing to do is give it a nudge and force it to look again.
- On Windows: Right-click your desktop, go to Display settings, and scroll down to the "Multiple displays" section. You'll see a Detect button. Clicking this tells Windows to actively scan for any new monitors you've hooked up.
- On a Mac: Head into System Settings > Displays. Often, just opening this panel is enough to wake the system up and make it recognise the new screen. In older versions of macOS, holding down the Option key while in this menu sometimes reveals a "Detect Displays" button.
If that doesn't do the trick, your next stop should be your graphics card drivers. Outdated drivers are a major cause of all sorts of weird display behaviour, including a flat-out refusal to recognise a second monitor. Head directly to the manufacturer's website—NVIDIA, AMD, or Intel—and grab the latest driver package for your specific graphics card. A quick update can solve a world of problems.
A flickering or stuttering screen is another classic issue. This is almost always a refresh rate problem. Dive into your advanced display settings and make sure the refresh rate (measured in Hz) is set to the highest number your monitor can handle. This one small change makes a huge difference in visual smoothness.
Solving Resolution and Scaling Woes
What if the monitor is working, but everything on it looks fuzzy, stretched, or just… wrong? This is a classic case of incorrect resolution or scaling. Every monitor has what's called a native resolution—the sharpest, clearest resolution it was built for. You'll want to find that in your display settings and set each monitor to its own native value.
Is the text and are the icons now painfully small? Don't be tempted to lower the resolution to make things bigger; that just makes everything blurry. Instead, look for the Scale setting in Windows or the Resolution options on a Mac (like "Larger Text"). This lets you make the interface elements bigger while keeping the image itself perfectly sharp.
Of course, sometimes the problem runs deeper. You could be dealing with a faulty port on your computer, a software conflict, or another hardware gremlin. If you've run through all these DIY steps and you're still staring at a misbehaving screen, it’s probably time to call in a professional. For those tricky issues that aren't just a loose cable, our on-site computer & laptop repairs in Hamilton can get to the bottom of it and have your setup running perfectly.
When you've tried everything and your dual monitor setup is still giving you grief, don't lose another hour to frustration. The team at Klimka Computer Solutions offers fast, reliable on-site diagnostics and repairs to solve even the most stubborn hardware and software conflicts. Let us get your workspace running smoothly. Find out more at https://klimkacomputersolutions.com.
One Response
[…] Getting these settings right is crucial, especially if you're working with more than one screen. For more tips on that, check out our guide on how to set up dual monitors with your Mac. […]